How to make a sari
Sari is Indian traditional wear.
Go shopping for the basic things
you need.
A saree has no exact dimension.
There is no hard and fast rule about the length and width of a saree. It is
usually approximate calculations. The width is usually between, 1.2 to 1.5
meter. And length is 5.5 to 6 meter. A 5.5 meter length is more than sufficient
for a comfortable draping of a sari.
Now, DIY are always
exciting. When the project is done, it can be flaunted with great pride. I
believe in a lot of Do It Yourself projects, be it anything.
It can be a short designing plan
of your idea of a saree or a 5 year project too. :-P Depending upon the
complexity of the design you finalize for your dream idea of sari.
-Choose your fabric and color.
-Choose your designing items.
Here, this is just a simple one.
And just very easy. All you need is some calculation, alignment and sewing.
I saw this huge roll of pink colored fabric with golden prints
and instantly got interested in the gold prints it held. Bought around 5.5
meter of this cloth.
Then I went hunting for a
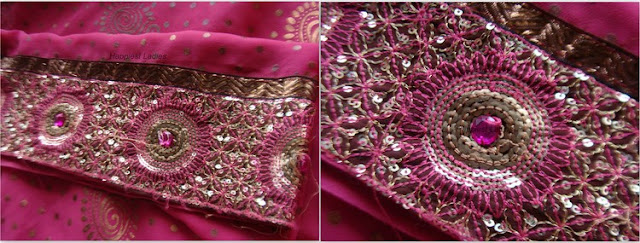
suitable border for the yet to be made saree. And finalized on a wide border
with golden shining circles and pink stone. The whole thing is got ready-made. I
did not do any additional designs on the border.
The fancy designing items are
easily available. Just that you have to know such stores at your city well. I
have found a whole sale dealer in my city. No. I don’t buy a lot, I only buy
when I need few things for personal designing of my own suits or sarees or
saree blouses.
The only work that is to be done
is to sieve the designed border along border of the sari. That is all.
If you work intelligently, you
can save a bit on the designing border. When you wear a sari, the inner most
first round of the sari will not be visible at all. So for the initial one
meter (or a little more or less) at the bottom side of the sari, the designed
borer need not be attached at all. And like wise if you consider the top side,
more than half the length of the sari will be tucked inside the sari skirt. So,
on the top side only half the length of the sari needs border attaching.
I hope I have made a clear idea. :-)
In short,
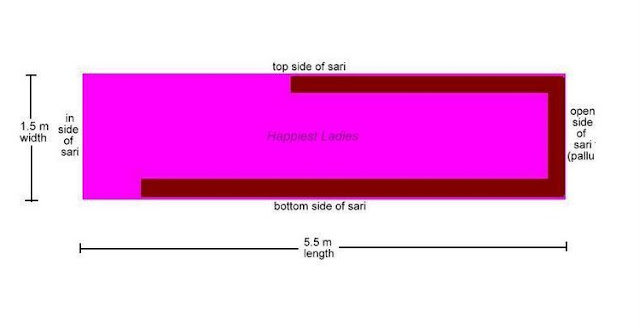
- Select a fabric that is at least 1.2 meter wide and 5.5 meter long to make a sari.
- Begin attaching the border from the pallu side, which is the open end of the sari.
- First attach the border along the width at the open end (that forms the pallu side) of the sari.
- Now, beginning from the open end side, on the top, attach the border length wise. Stop at half the length of the sari. Rest of the side goes invisible since it gets tucked inside the sari skirt.
- Now, the bottom side. Begin from the pallu. Attach along the bottom line of the sari and stop when you are left with about 1 meter.
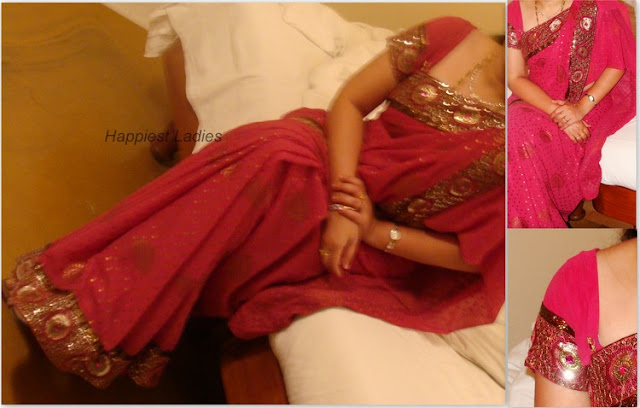
Sari making is completed. :-).
Optionally, you can add hangings
at the pallu end, or even sieve some decorative items on the sari for the
pallu. Feel free and design to your hearts contents.
Buy any matching blouse piece
and again get your design done. If you are not comfortable with anything else,
u another meter of the same sari fabric for blouse. And another half a meter of
the designed border for attaching at ate end of the blouse arms.
This way you will save loads of
bucks for all that it termed designer sarees. You are just paying for the
fabric and the fancy decorative items. All the stitching cost, labour cost,
dealers cost, meddle men commission, shipping cost, all that is vanished from
the DIY sari.
So, happy sari making.
If this space has been making you
Happy so far, please like Happiest Ladies on Face Book. Thanks for
making me Happy. :-)
Also read:


Post a Comment